
DIY Home Office
Warning, long post. You may want coffee before starting!
When we bought the house in May of 2010, Becky claimed the Bonus room over the garage for her office. However being the kind mother that she is, she rented it to Jeremy until he decided on a permanent solution. That solution came in the form of his wedding on December 31, 2013.
So, shortly after that date, Becky looked at me and said it’s time to move into my new office. But that meant destruction, construction, painting and thinking out of the box. Of course, all within a budget.
So Becky and I together, (with help from Jeremy and Ashley Bayne, Chris and Ashley Schrom) off we went into the adventure……
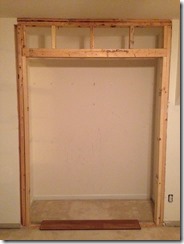
The room is basically 16 x 16 with a 10’ x 28” out cropping on the south east wall. It also had a closet that was 72” x 22”, but with a 32” door in the center for access. That was the first project to take on. Make the opening large enough to give full access to the closet.
The next step was paint… now when we moved in, Jeremy painted one wall black to cut down on the glare when watching his large fancy tv. So, on went 3 coats of Kilz primer and numerous coats of paint.


Oh yeah, had to move the plug on the left side of the door. Usually I would hand over that job to my in house electrician, but he was somewhere in the northeast earning a living. So, in I dove.
Fortunately for me, it was the last plug in the run and I was able to disconnect it, remove the plug and frame the door.
Now the big decision, what to do about the carpet? Clean it, Stretch it or replace it. If we replace it, what to replace it with. New carpet or Wood. We settled on really wanting the “Warmth” of wood.
So off to Lowes, Home depot and a local flooring store.
Ah the choices:
Real Wood – Way too expensive
Engineered Flooring – Less expensive, but still over budget
Laminate Flooring – Just Nope!
What to do, what to do. The girls had the answer…head to Pinterest.
What was the Answer????
Here is the thinking out of the box thing.
PLYWOOD…..yep Plywood
After research and price shopping, we decided on 1/2 Birch Plywood. We covered the the subfloor with flooring paper to cut down drafts from the garage below.
But before we could put down the wood, we had to remove the carpet and the padding.

Onto the wood:
8 sheets of 4×8 1/2 Birch plywood cut into 8” strips. Home Depot helped us out by cutting the strips so I did not have too.
Two issues:
- When you cut 8” strips out of a sheet of plywood, you get 6 strips, but the last strip is less than 8”. Keep that in mind when laying the floor because the boards wont be even. With 48 strips cut from 8 boards there are 8 strips that are almost 1/4 more narrow than the rest. We had to make sure that these all matched end to end.
- You cannot sand the edges of Birch plywood without getting splinters. So how do we smooth out the cuts without them? A round over bit on my router mounted to a hand made router table did the trick. We decided what would be used as the top surface of the board and ran each top edge through the router. 48 strips x 2 edges equals 96 passes through the router. This also made the illusion of having tongue and groove joints after installation.
With both issues solved, it was time to build the puzzle.. good thing I am married to an artist with a sense of direction.
Dimes were the next key. We used them to create the gap between each plank for expansion. This worked great, except sometimes they got stuck and had to be removed with Pliers. BTW.. I had a GREAT assistant throughout the project.
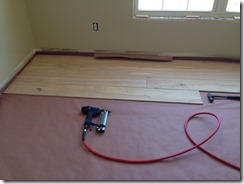


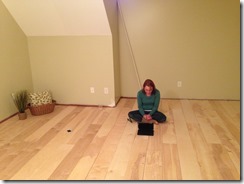
Elise arrived via Facetime just as we finished laying all the boards. So grandma decided to try out her new office.
Next step was to carefully sand the wood. We used 220 grade sand paper, wrapped around a large car wash sponge. This worked great and kept the sand paper even.
We sanded twice prior to applying the polyurethane and then once between each of the four coats.
We used Varathane High Traffic oil based polyurethane applied with a Lambs Wool 6” applicator. I also found this trick on line.
I used a 1 gallon watering bucket (think garden) to pour the polyurethane onto the floor instead of a paint pan to dip the applicator in.
2 coats of Semi-Gloss and then 2 coats of Satin.
Then down went the trim, and the 1/4 round to finish the floors.
Lastly for this phase we finished where we started.. at the closet.
We used 1/2 sanded plywood for the closet shelves, braced to support office supplies. With Jeremy’s help we hung the doors on the closet rebuilt from the beginning of the job.
Ready to move in.
Still a bit of work to do. You can see that alcove in the last picture above. We will build base cabinets and wall shelves to place here. I will post more pictures after we move the hard working lady in and then more after the cabinets are done.







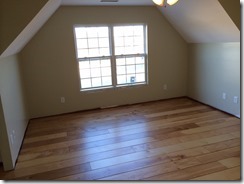

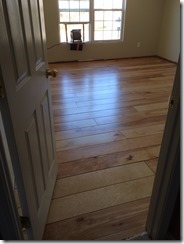


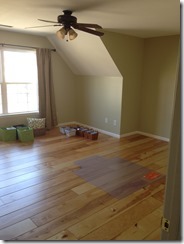
Floors turned out great! I really like them. I hope all is well in the Emdeon world.
Take care,
Eric
Thank you… Emdeon is still the same. How’s the new job?