The Story of the Farmhouse Table with a Race Track
While working my day job, one of my managers came to my desk to ask if I could build her a farmhouse table.
As it turns out she ordered a farmhouse table and bench on Etsy. However the person she ordered it from fell off the face of the earth and left her without a table or her money (Etsy made good on it for her).
The reason she ordered that particular table was because of the three legged bench. She has a young son and was concerned that he would turn over a two legged bench. This design appeared to give her the stability that she wanted.
My reply, “I can help!”
After seeing the picture of the table she ordered I told her to give me a few days and I could find her an alternative. So I went out to one of my trusted bloggers, Rogue Engineer and found the table I wanted to build.
Make sure you check out his site and follow him on social media.
After getting her approval of the style and layout, we agreed on a price and some minor adjustments to the plans. She wanted a 7 foot table and she only wanted one bench, but that bench needed that third leg.
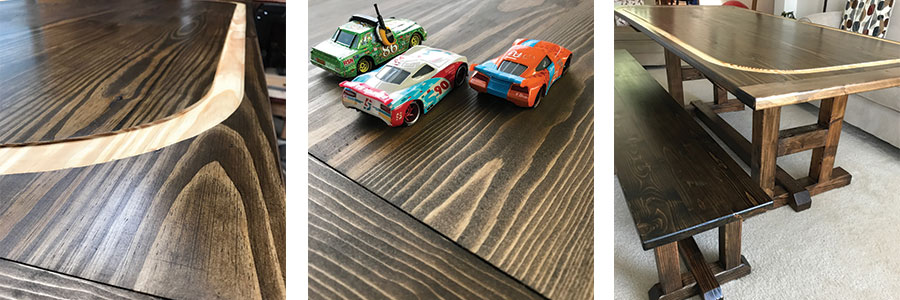
Now the “Curve”
A couple of days after we agreed on the project my client called and said she had an idea. They were struggling to get their young son to the dinner table.
“Can I add a 1½” wide by 1/8th inch deep race track around the top of the table?”
After I caught my breath, I gave her some alternative ideas to avoid cutting a race track into what I knew was going to be a beautiful table. She was convinced this is what she wanted, so I said, “Well, this is why we call ourselves Bayne CUSTOM Woodworking.”
So I agreed and then the adventure began.
The Build
Instead of recreating what Rogue Engineer already did I will refer you to his free plans on his site. See the link in the opening paragraph. He will provide the materials list needed.
Below I outline the changes I made to the table and bench. While not huge changes, there are some that I made to meet the client’s requests and some to add my own unique style.
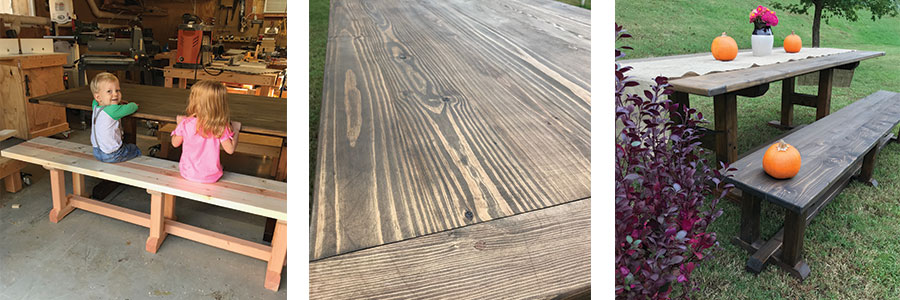
The plans call for a table that is 110” while I made mine to fit the client request of 84”. Because I trimmed my boards I ended up with a 40” wide top instead of a 42” wide. She wanted only one bench so I made an 80” bench with 3 legs instead of the 2 legged bench.
Let me also state up front that I rarely, if ever, use pine to build anymore, but I did use it on the job because of the short time frame I had and knowing how it was going to be used in their home. In the future I will go back to my local mill and use poplar.
Preparing the Materials for the Table Top:
Bayne Custom Woodworking is a participant in the Amazon Services LLC Associates Program, an affiliate advertising program designed to provide a means for sites to earn advertising fees by advertising and linking to Amazon.
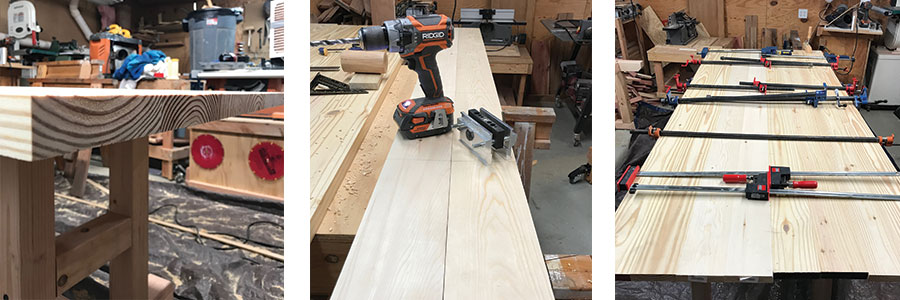
The project started with 8 – 2x6x96 pine boards purchased at Lowes. A common feature of farmhouse tables offers a round over edges between each board. I wanted to build a more traditional table top and build with jointed edges and a perfectly flat table.
I started by using my Porter Cable bench top jointer to make the face of each board flat and true. Then I used the same tool to make one edge flat and true. See this link for my newer and upgraded Jointer
Then the boards went through the 13” RIDGID surface planer to plane the other face and my RIDGID table saw to trim the other edge. The goal was to make the boards as rectangle as possible. See this link for my newer and upgraded Planer
Assembly of the Farmhouse Table Top
To join these boards together I chose to use my Dowl-it 1000 Self-centering Doweling Jig to keep the boards even and secure. To join all 8 boards together at one time would be too heavy and could cause them to cup when gluing and clamping so I chose to work with 2 boards at a time. This would also allow me to sand each glue-up easier with my drum sander (more on that later). See this link for my newer and upgraded Domino tool
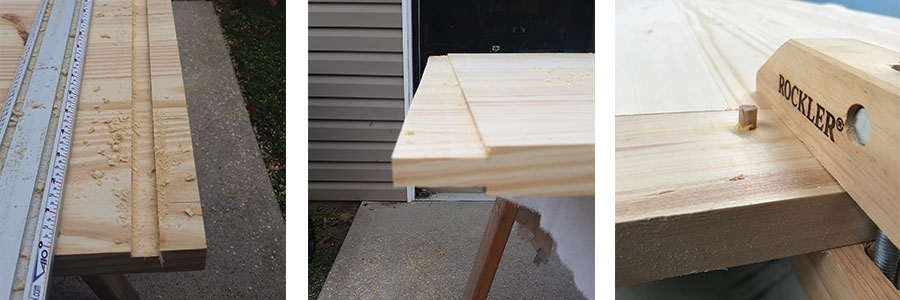
Matching Opposite Grains
To avoid cupping when the table is complete do your best to glue boards together with opposite grains.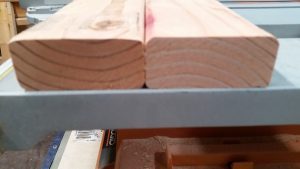
Choose 2 boards whose edges match and form a tight joint and start with them. If you have issues with the edges you can always run them through the jointer again or hand plane to get the joint as tight as possible.
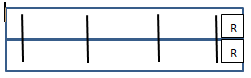
Place the boards together and using a square, mark across the boards where you want to place the dowels.
TIP: I always place an “R” on the right end and face of each board so that I make sure when I put them together with the dowels I have not gotten turned around.
The jig will allow you to use multiple sized dowels, however I chose to use 3/8” dowels for this project.
Gluing and Clamping
After drilling the holes I used Titebond Original wood glue to secure all the dowels and the joints.
Using pipe clamps I secured the boards together ensuring there was not cupping taking place. I prefer to use Bessey BPC-H12 1/2-Inch H Style Pipe Clamps because they are stable and dependable.
I wiped the access glue with a wet cloth and set the glue-up aside to dry.
I repeated this 3 more times to get the 4 sets of 2 – 1×6 boards.
Drumsanding the Farmhouse Table Sections
Once dried and removed from the clamps I used my SuperMax drum sander to even them out and clean up the glue. Not everyone has one of these so other options are using a belt sander or orbital sander.
I took the 4 sets and glued 2 each together using the same method as above. Cleaned them up after drying and then finished by gluing the final 2 sets together to make the final size of 41 inches.
Sand the final piece to clean up any of the glued joints and make sure that all the boards are flat and even. I use a 4’ level laid across the farmhouse table to verify it is flat and is not cupped. If cupped then more sanding is required until satisfied.
Breadboards
Wide farmhouse tables often employ breadboard ends to keep things flat, as well as cover end grain. If it’s done right, expansion and contraction problems can be nearly eliminated. There are many methods to attach breadboard ends but I used the method outlined here Woodmagazine.com
Tenons
To cut the tenon portion I used my router with a ¾” straight bit. I used a straight edge as a guide in order to keep the cut straight.
The best way I found to make sure the tenon was even and centered on the thickness of the board was to set my router to cut a 1/4th inch deep at a time. I routered the top on both ends and then flipped the table and did the same on the bottom of the table. The goal using 1 ½” lumber was to have a 3/8” tenon.
Mortis
Now time to cut the breadboard end cap and create the mortis. I used a 3 ½’ board cut to length to match the width of the table. I used my drill press to cut the mortis and then cleaned it out with my chisel.
Following the instructions as spelled out on the link above I set the breadboard and set the dowels.
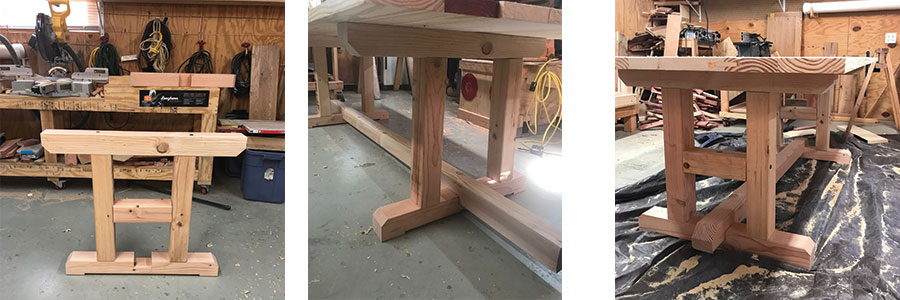
Building the Base
Building the base following the plans was a very simple process. The most involved part was cutting the half laps to join the pieces. For the smaller pieces I used my Oshlun stack dado blade on my Ridgid table saw. See this link for my newer and upgraded Dado Stack
For the longer pieces it was easier to use my Dewalt 12” sliding compound miter saw with the depth stop set to stop half way into the board and them use a chisel to clean them out. The other option would be use a router with a ¾” bit or even a circular saw, which is the way that Rogue Engineer did it.
Adjusting the Length
Because I shortened the length of the farmhouse table, I had to also adjust the length of the lower cross beam and the top 2×4 supports for the base. I first determined that I wanted 16” over hang on each end in order to slide chairs under. Once this was determined, I could then set the length of these 2×4 supports. I clamped them together, found the center and using my miter saw I cut a 3 ½” mortis in them at the same time to accept the center support that will be installed at center of the bottom of the table.
In order to set the center support, I put the base together, placed the top on the base exactly where I wanted it. I then marked the bottom of the table exactly where the mortis was on each 2×4 from the above step. I installed the 2×4 which allows for the table to set on the base accurately and easily.
Bench Assembly
I followed all the steps outlined in the plans provided using the same process as I did the table above.
Dowels to join the bench boards, half-laps to join the legs using my stack dado and half-laps using my miter saw for the bottom cross beams.
I changed two items for the bench from the plans.
- Increased the length to 82” because client only wanted 1 bench
- Added a third leg in the middle because client wanted a three legged bench.
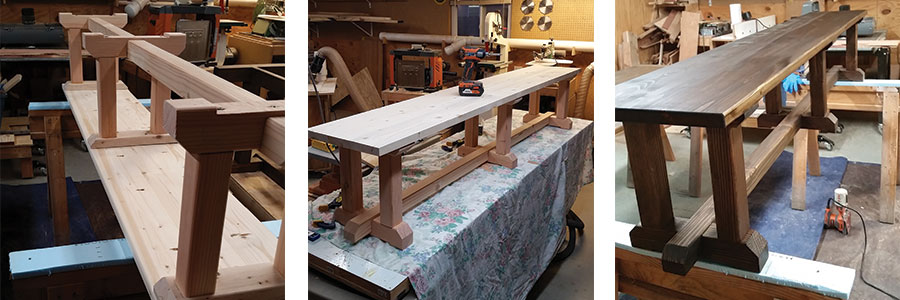
Sanding, Staining and Polyurethane:
Once assembled, I could no longer use my drum sander so I turned to my Ridgid R2501 1/4 Sheet Sander. Starting with 60 grit sand paper, I ended with 180 grit sand paper. See this link for my newer and upgraded Sanders
I then used Minwax Jacobean stain and applied with a cotton rag. After allowing it to sit for a few minutes, I wiped it down and let it dry completely for 3 days. I do this in order to make sure it is completely dry so the next step won’t pull any stain off.
I the used my homemade polyurethane mix and applied multiple coats.
How did I make that Curved Race Track?
I know I needed to be 1” from each side and at least that from the inside of the breadboard. I could not go into the breadboard because I could have run into that mortis and tenon.
Using a 4×4 sheet of ½” plywood, I cut it to the width of the table. Then I measured the distance of the outside of my router plate to the outside edge of my ¾” router bit.
The distance was 2½” so added the 1” I wanted the track from the edge giving me 3½”. Using the marks I drew a straight line down each side 3½” from each edge.
Then I determined I needed to be 7½” from the edge of each end in order to miss that breadboard and allow for the router plate. Using the marks I drew a straight line across each end. I found a bucket with the curve that I wanted and used it to draw the curves on each end.
Routering the Race Track into the Farmhouse Table
I clamped it to the table top, said a prayer and start my router. Using my Dewalt plunge router I set the depth gauge and slowing plunged into the table top. Whew the first pass went better than expected. Because I used a half sheet, I flipped it to the other end, reset it, clamped it and proceeded to router.
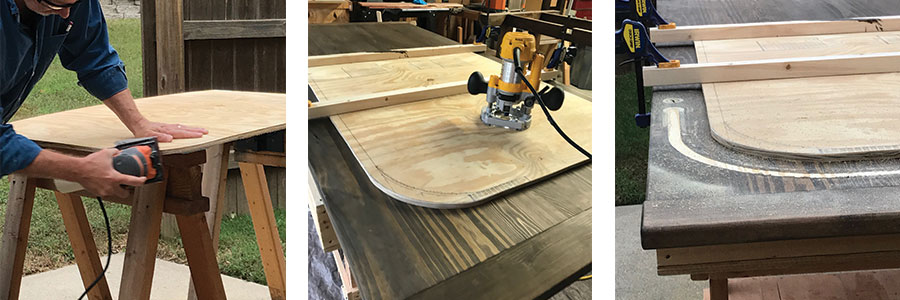
DONE – with the first pass.
Repeating the process
Because we wanted it 1½” wide and I was using a ¾” bit I needed to cut the template board down ¾” of an inch. Clamp it to the table top and start again.
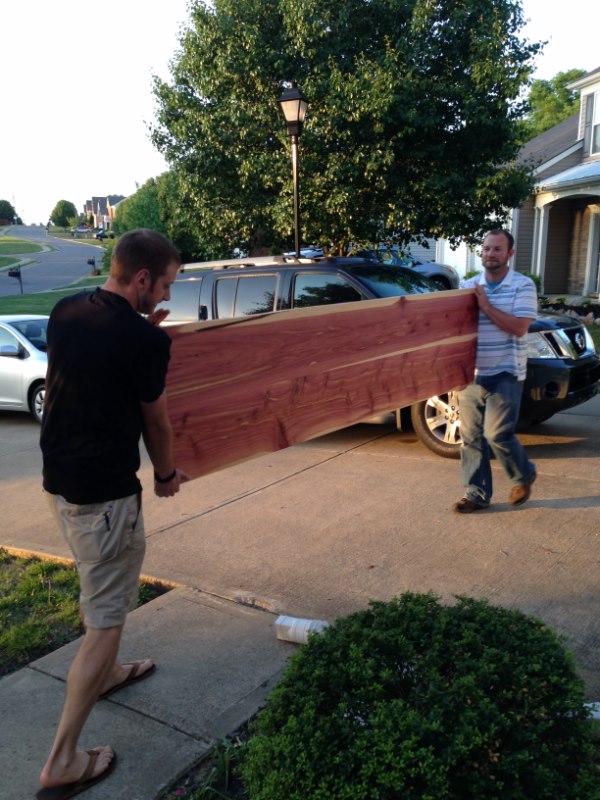
Hand sand it to clean up the router marks and take a sigh of relief. Now all we had left to do was deliver it!